How to Create a New Design
Before you attempt to create a new design in Simparel, make sure that you have created the right merchandise groups, colors, sizes, and seasons.
To Learn more about merchandise groups and how to create them, click on this button:
To Learn more about merchandise groups and how to create them, click on this button:
To learn how to create colors, click on this button:
To learn how to create sizes, click on this button:
To learn how to create a season, click on this button:
If you do not need to create any merchandise groups, colors, or sizes right now, then scroll down to see the steps for creating a new design in Simparel.
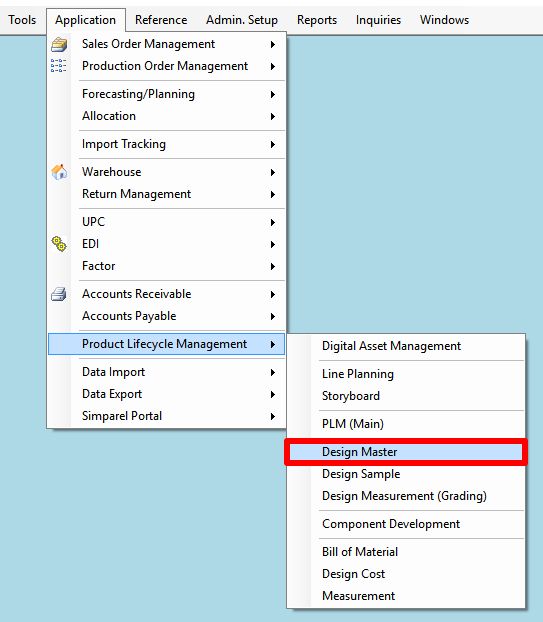
Open the Design Master Application
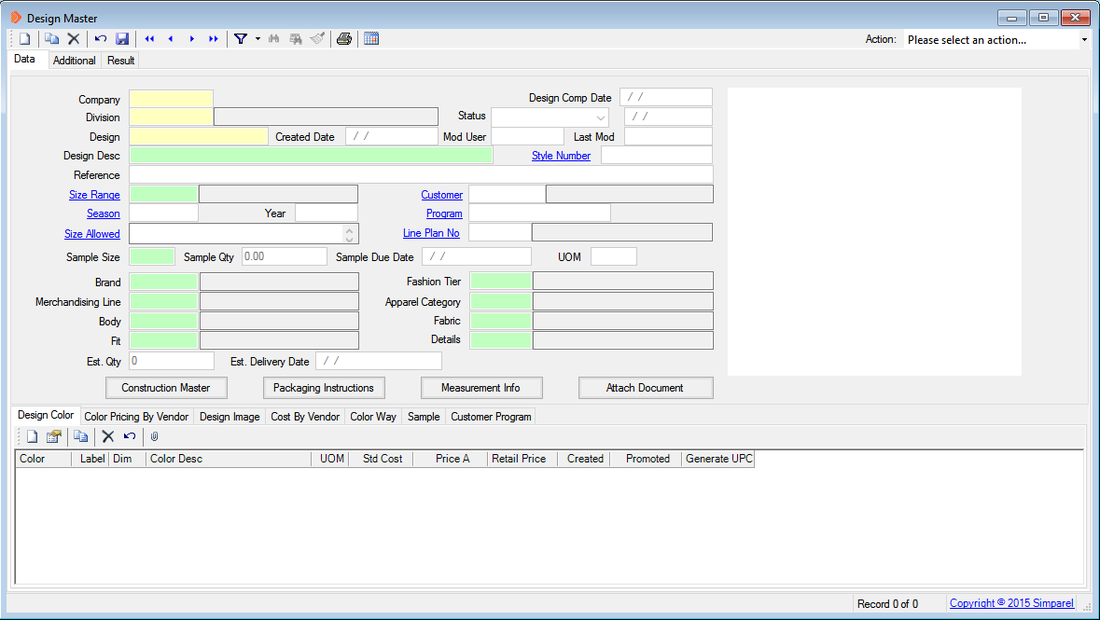
The Design Master window will open.
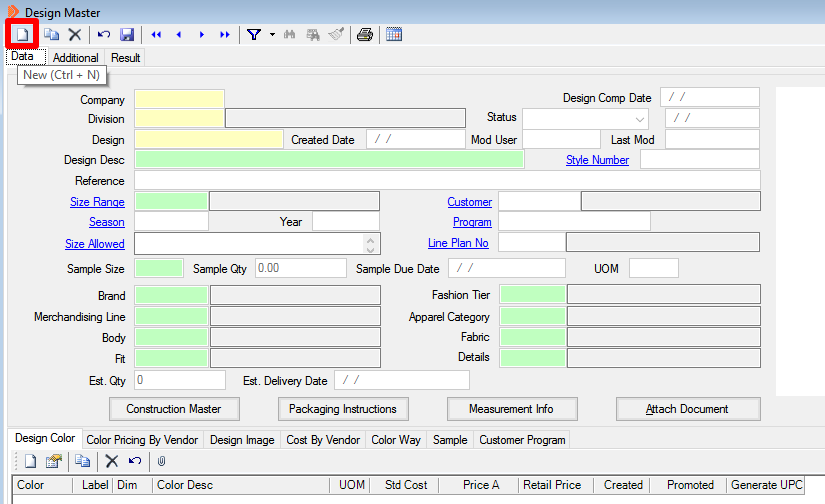
Click on New Design
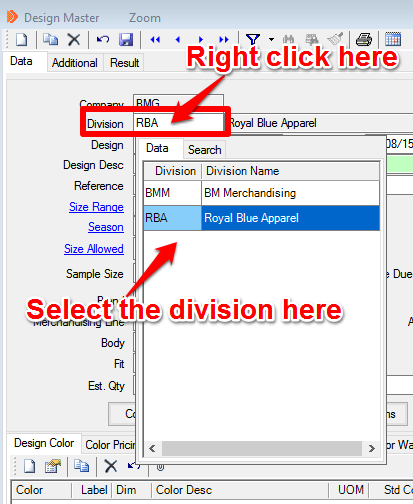
Fill in the Division
Right click the rectangle next to Division.
A window will appear showing the different divisions to choose from.
Double click on the division option you want.
A window will appear showing the different divisions to choose from.
Double click on the division option you want.
Type in the Design Description
Next to Design Desc., type in a description of the design. Be as descriptive as possible.
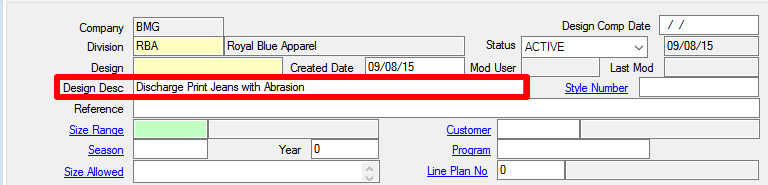
Fill in the Reference Number
If you have a reference number for this design - for example if the buyer has a style number which they use to refer to the design - then type it next to Reference.

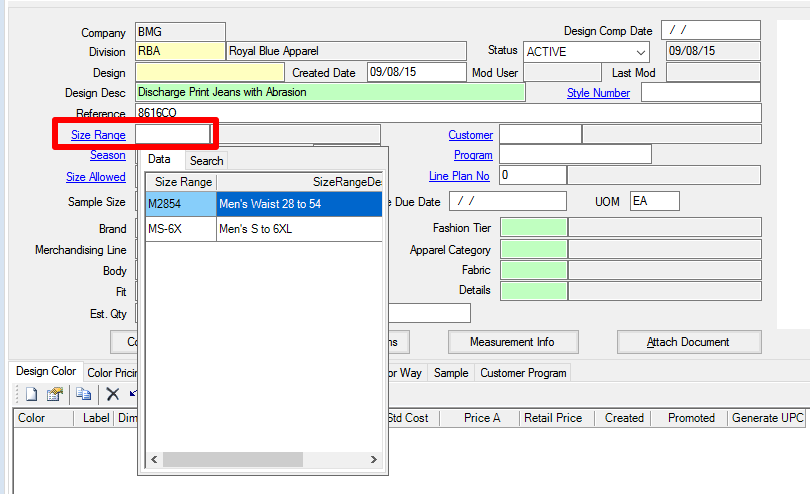
Select a Size Range
Right click on the field next to Size Range.
Double click on one of the options that appears for the range of sizes that the design will contain.
Note that the size range options will be larger than your actual intended size range. That is OK as long as your intended size ranges falls under the larger range. In that case, there is no need to create another range specifically for your design.
Note also that M stands for Men's and J stands for Juniors'.
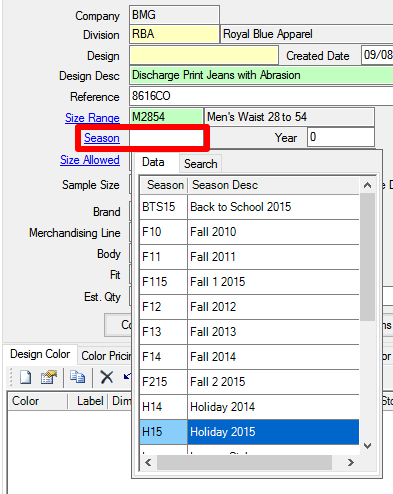
Select a Season
Right click on the field next to Season.
Double click on the season for which you are creating this design.
Double click on the season for which you are creating this design.
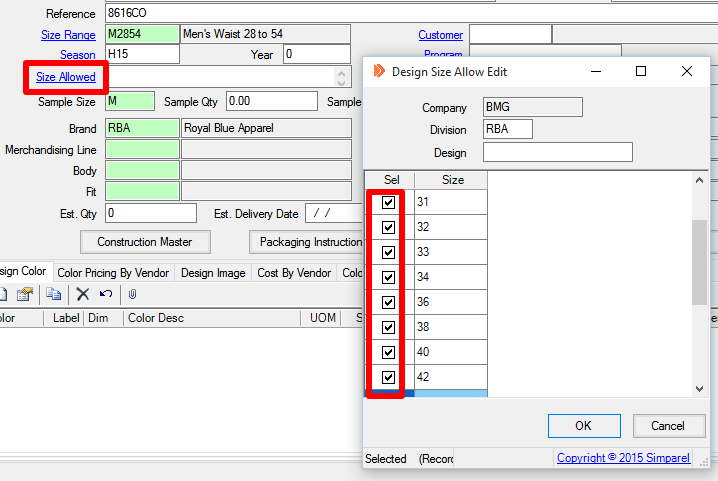
Select the Sizes Allowed
This step allows you to specify exactly which sizes are allowed for this design. You can always come back here and change this.
Click on the WORD Sizes Allowed. A Design Size Allow Edit window will appear.
Check off the sizes which you want this design to have.
Click OK at the bottom right.
Click on the WORD Sizes Allowed. A Design Size Allow Edit window will appear.
Check off the sizes which you want this design to have.
Click OK at the bottom right.
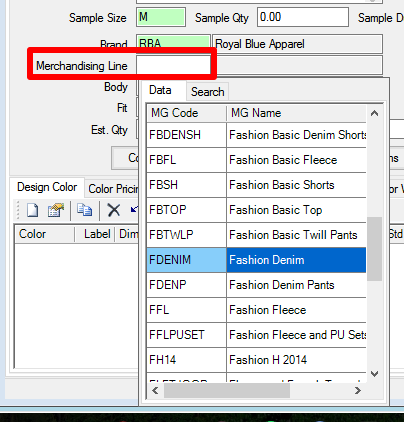
Select a Merchandising Line
A merchandising line is a broad category or theme which the design falls under. Please discuss with you fellow designers and merchandiser to determine what the lines for the season are.
Right click on the field next to Merchandising Line.
Double click on the Merchandising Line option you want.
Right click on the field next to Merchandising Line.
Double click on the Merchandising Line option you want.
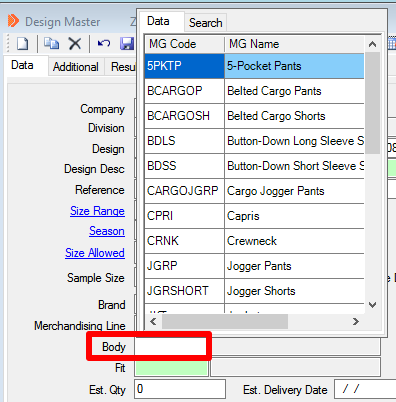
Select a Body
Right click on the field next to Body.
Double click on one of the options that appear for the body type of the design.
Double click on one of the options that appear for the body type of the design.
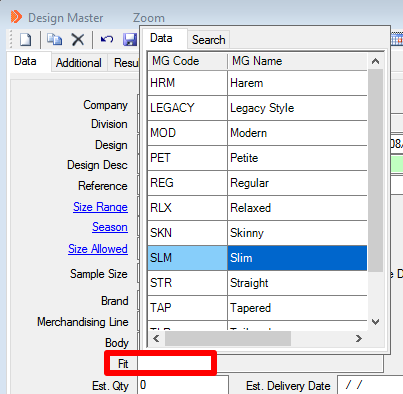
Select a Fit
Right click on the field next to Fit.
Double click on one of the options that appear for the fit of the design.
Double click on one of the options that appear for the fit of the design.
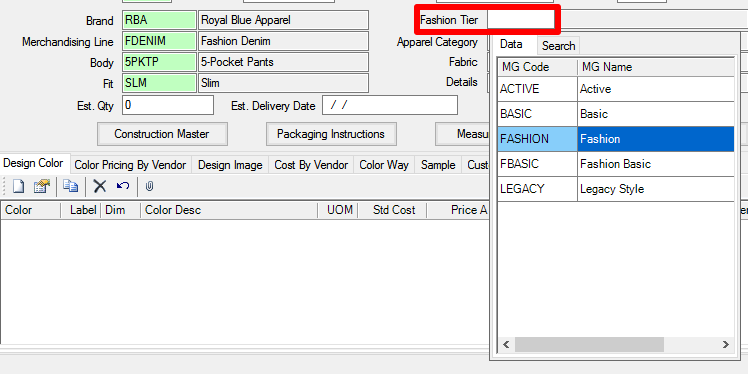
Select a Fashion Tier
Right click on the field next to Fashion Tier.
Double click on one of the options that appear for the fashion tier of the design.
Double click on one of the options that appear for the fashion tier of the design.
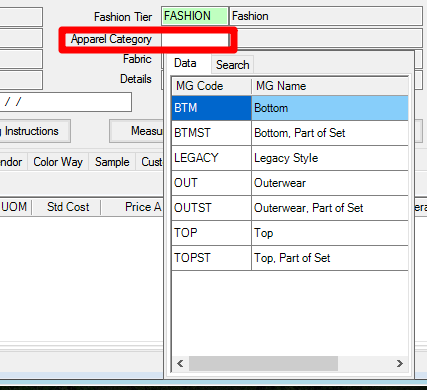
Select Apparel Category
Right click on the field next to Apparel Category.
Double click on one of the options that appear for the apparel category of the design.
Double click on one of the options that appear for the apparel category of the design.
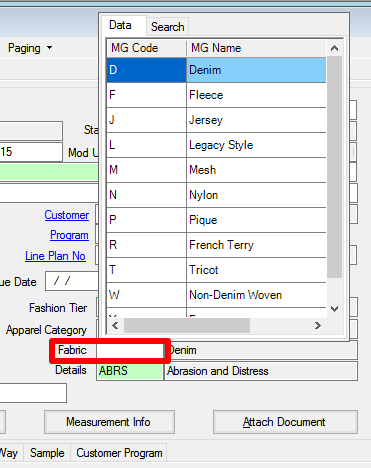
Select the Fabric
Right click on the field next to Fabric.
Double click on one of the options that appear for the fabric of the design.
Double click on one of the options that appear for the fabric of the design.
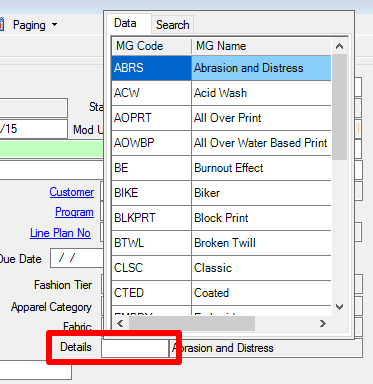
Select the Details
Details include extra information about the design that may not have been captured by the other merchandise groups.
Since details can only convey one particular detail of the design, please select the one that is most representative of the design.
Right click on the field next to Details.
Double click on one of the options that appear for the detail of the design.
Since details can only convey one particular detail of the design, please select the one that is most representative of the design.
Right click on the field next to Details.
Double click on one of the options that appear for the detail of the design.
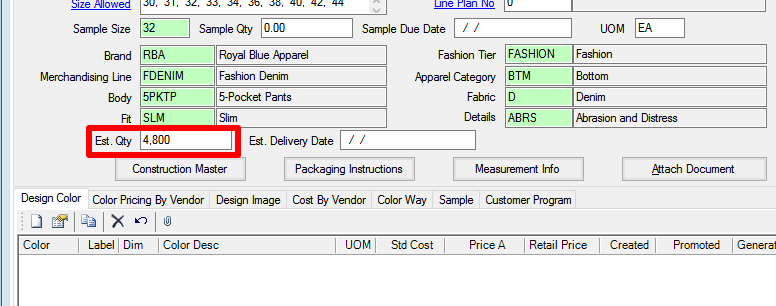
Enter the Estimated Production Quantity
If you know in advance how many units are being planned for this design, enter it next to Est. Qty.
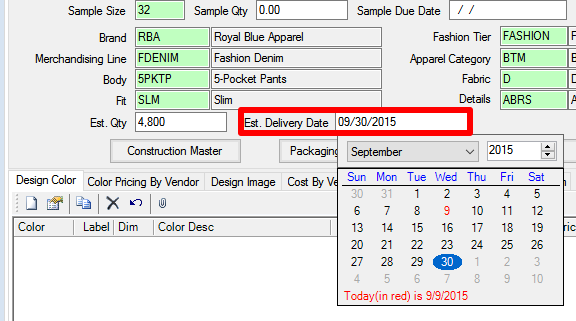
Enter the Estimated Delivery Date
If you know in advance the delivery date planned for this design, enter it next to Est. Delivery Date.
Right click on the field next to Est. Delivery Date.
A calendar will appear.
Use the month drop down and year to find the delivery date.
Click on the desired date.
Right click on the field next to Est. Delivery Date.
A calendar will appear.
Use the month drop down and year to find the delivery date.
Click on the desired date.
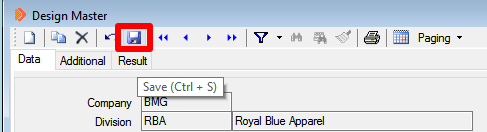
Save the Design
Click on Save at the top right of the Design Master window.
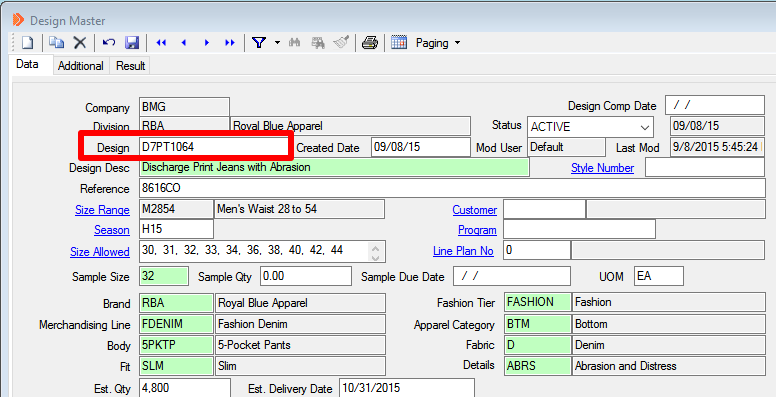
After saving, Simparel will take the information you entered for the Merchandise Groups to auto-generate a style number.
The style number is generated in this way:
1st Letter - From Fabric.
2nd Number - From Fashion Tier:
- 1 - Basic,
- 4 - Fashion Basic,
- 7 - Fashion.
Last 4 Digits - Continuously goes up for each new style number.
The style number appears next to Design.
Next Steps
Add colors or washes to the design. Learn how to do so by clicking on this button:
END OF PROCESS